我的GCP谷歌云按照网上通用的教程通过脚本dd Windows系统,结果发现无法连接,据说是网络设置有问题。但是按照VPS上的IP填入后依旧有问题 —— 原来这里是有个大坑
我遇到的坑(错误示例不需要照着做,正确流程往下翻)
首先我这边查看 GCP 的 VPS 的网卡设置
cd /etc/sysconfig/network-scripts/
ls
这个目录下,ifcfg-***就是网卡的设置,我这里是vi ifcfg-eth0
ifcfg-eth0 ifdown-ppp ifup-eth ifup-sit
ifcfg-lo ifdown-routes ifup-ippp ifup-Team
ifdown ifdown-sit ifup-ipv6 ifup-TeamPort
ifdown-bnep ifdown-Team ifup-isdn ifup-tunnel
ifdown-eth ifdown-TeamPort ifup-plip ifup-wireless
ifdown-ippp ifdown-tunnel ifup-plusb init.ipv6-global
ifdown-ipv6 ifup ifup-post network-functions
ifdown-isdn ifup-aliases ifup-ppp network-functions-ipv6
ifdown-post ifup-bnep ifup-routes
然后cat查看网卡设置里的内容
cat ifcfg-eth0
查看到内容
BOOTPROTO=dhcp
DEVICE=eth0
HWADDR=06:3a:d5:22:f1:b8
ONBOOT=yes
TYPE=Ethernet
USERCTL=no
发现是 dhcp 也就是自动获取 IP
于是我直接 …… 最后无法连接
只好删掉重装
在网上查阅资料发现 GCP 必须手动设置网卡
于是我输入
ifconfig

#如果提示没有这个命令的话,可以先安装
yum -y install net-tools #CentOS
eth0: flags=4163<UP,BROADCAST,RUNNING,MULTICAST> mtu 9001
       inet 10.140.0.7 netmask 255.255.255.255 broadcast 10.140.0.7
发现内网 IP 是 10.140.0.7 掩码( Mask )是 255.255.255.255
而broadcast并不是“网关( Gateway )”,而是“广播”
网关可以通过其他方式查询到,比如
netstat -rn
得到类似于这个
Kernel IP routing table
Destination     Gateway         Genmask         Flags   MSS Window  irtt Iface
0.0.0.0         10.140.0.1      0.0.0.0         UG        0 0          0 eth0
10.140.0.1      0.0.0.0         255.255.240.0   U         0 0          0 eth0
没有特别设置过的话,一般是内网IP最后一位换成 1
别以为这样就可以了。。。
直接加入刚刚得到的 --ip-addr 10.140.0.7 --ip-mask 255.255.255.255 --ip-gate 10.140.0.1 就完蛋了
你会发现又无法连接
原因我也不太清楚,实际上掩码应该是255.255.255.0,网关是10.140.0.1
最终成功~
GCP 安装 Windows系统 正确流程
准备材料
- 系统推荐是 Debian 9 (只测试过这个版本的成功安装)
- 硬盘至少需要大于6G,推荐最低10G(当然是越高越好)
- 寻找自己准备安装的系统的 dd 包
- 选择好 dd 包后一定要测试链接可用性。 Linux 上可以直接
wget 链接 , Win 上可以直接在浏览器粘贴,查看能否正常下载,如果出现不能下载或者无法打开等错误就说明链接失效了,得找其他 dd 包链接!
精简版的DD包(硬盘小推荐)
# DD Windows Server 2003 32位 精简版 [账户Administrator密码cxthhhhh.com]
wget --no-check-certificate -qO InstallNET.sh 'https://moeclub.org/attachment/LinuxShell/InstallNET.sh' && bash InstallNET.sh -dd 'https://oss.sunpma.com/Windows/Win_Server2003_86_Administrator_cxthhhhh.com.gz'

# DD Windows Server 2008 R2 64位 精简版 [账户Administrator密码WinSrv2008x64-Chinese]
wget --no-check-certificate -qO InstallNET.sh 'https://moeclub.org/attachment/LinuxShell/InstallNET.sh' && bash InstallNET.sh -dd 'https://oss.sunpma.com/Windows/Win_Server2008R2_64_Administrator_WinSrv2008x64-Chinese.gz'

# DD Windows Server 2012 R2 64位 精简版 [账户Administrator密码WinSrv2012r2x64-Chinese]
wget --no-check-certificate -qO InstallNET.sh 'https://moeclub.org/attachment/LinuxShell/InstallNET.sh' && bash InstallNET.sh -dd 'https://oss.sunpma.com/Windows/Win_Server2012R2_64_Administrator_WinSrv2012r2x64-Chinese.gz'

# DD Windows Server 2019 Datacenter 64位 精简版 [账户Administrator密码WinSrv2019dc-Chinese]
wget --no-check-certificate -qO InstallNET.sh 'https://moeclub.org/attachment/LinuxShell/InstallNET.sh' && bash InstallNET.sh -dd 'https://oss.sunpma.com/Windows/Win_Server2019_64_Administrator_WinSrv2019dc-Chinese.gz'

# DD Windows7 32位 精简版 [账户Administrator密码Windows7x86-Chinese]
刀云网wget --no-check-certificate -qO InstallNET.sh 'https://moeclub.org/attachment/LinuxShell/InstallNET.sh' && bash InstallNET.sh -dd 'https://oss.sunpma.com/Windows/Win7_86_Administrator_Windows7x86-Chinese.gz'

# DD Windows7 sp1 64位 旗舰精简版 自带IIS [账户Administrator密码www.nat.ee]
wget --no-check-certificate -qO InstallNET.sh 'https://moeclub.org/attachment/LinuxShell/InstallNET.sh' && bash InstallNET.sh -dd 'https://oss.sunpma.com/Windows/Win7_64_sp1_IIS_Administrator_www.nat.ee.gz'

# DD Windows7 64位 旗舰精简版 [账户Administrator密码www.nat.ee]
wget --no-check-certificate -qO InstallNET.sh 'https://moeclub.org/attachment/LinuxShell/InstallNET.sh' && bash InstallNET.sh -dd 'https://oss.sunpma.com/Windows/Win7_64_Administrator_www.nat.ee.gz'

#DD Windows8.1 64位 专业精简版 [账户Administrator密码nat.ee]
wget --no-check-certificate -qO InstallNET.sh 'https://moeclub.org/attachment/LinuxShell/InstallNET.sh' && bash InstallNET.sh -dd 'https://oss.sunpma.com/Windows/Win8.1_64_Administrator_nat.ee.gz'

# DD Windows10 2019LTSC 64位 企业精简版 [账户Administrator密码nat.ee]
wget --no-check-certificate -qO InstallNET.sh 'https://moeclub.org/attachment/LinuxShell/InstallNET.sh' && bash InstallNET.sh -dd 'https://oss.sunpma.com/Windows/Win10_2019LTSC_64_Administrator_nat.ee.gz'
完整版的DD包
# DD Windows Server 2012 R2 Datacenter 64位 完整版 [账户administrator密码Password147]
wget --no-check-certificate -qO InstallNET.sh 'https://moeclub.org/attachment/LinuxShell/InstallNET.sh' && bash InstallNET.sh -dd 'https://oss.sunpma.com/Windows/Whole/cn_windows2012r2_administrator_Password147.gz'

# DD Windows Server 2016 Datacenter 64位 完整版 [账户administrator密码Password147]
wget --no-check-certificate -qO InstallNET.sh 'https://moeclub.org/attachment/LinuxShell/InstallNET.sh' && bash InstallNET.sh -dd 'https://oss.sunpma.com/Windows/Whole/cn_windows2016_administrator_Password147.gz'

# DD Windows Server 2019 Datacenter 64位 完整版 [账户administrator密码Password147]
wget --no-check-certificate -qO InstallNET.sh 'https://moeclub.org/attachment/LinuxShell/InstallNET.sh' && bash InstallNET.sh -dd 'https://oss.sunpma.com/Windows/Whole/cn_windows2019_administrator_Password147.gz'

# DD Windows10 2019LTSC 64位 [账户Administrator密码win10ltsc]
wget --no-check-certificate -qO InstallNET.sh 'https://moeclub.org/attachment/LinuxShell/InstallNET.sh' && bash InstallNET.sh -dd 'https://oss.sunpma.com/Windows/Whole/Win10_2019LTSC_64_Administrator_win10ltsc.gz'
流程
- 在 GCP控制台 上找到需要安装 Windows 的 VPS 的内网 IP ,如
10.140.0.7
- SSH 连接到这个VPS,使用 root 用户,(如没有开启 root ,可以输入命令
sudo -i 切换成 root 用户)。
- 需要先安装所需软件
#Debian/Ubuntu:
apt-get install -y xz-utils openssl gawk file

#RedHat/CentOS:
yum install -y xz openssl gawk file
如果出现了错误,请运行
#Debian/Ubuntu:
apt-get update

#RedHat/CentOS:
yum update
———-分割线———-
wget --no-check-certificate -qO InstallNET.sh 'https://moeclub.org/attachment/LinuxShell/InstallNET.sh' && bash InstallNET.sh --ip-addr X.X.X.X --ip-mask 255.255.255.0 --ip-gate X.X.X.X -dd '[DD包 直链地址]'
- 将上面第一个的 X.X.X.X 改成自己的 内网IP ,第二个X.X.X.X 改成自己的内网IP后把最后一位替换成
1,如10.140.0.7,和10.140.0.1。(GCP 的台湾网关是10.140.0.1,香港是10.170.0.1)
- 把上面的
[DD包 直链地址]替换成前面想安装的系统的地址,记得保留前后的' '
- 把改好的命令输入回车!比如我的(不要直接复制哦)
wget --no-check-certificate -qO InstallNET.sh 'https://moeclub.org/attachment/LinuxShell/InstallNET.sh' && bash InstallNET.sh --ip-addr 10.140.0.7 --ip-mask 255.255.255.0 --ip-gate 10.140.0.1 -dd 'https://image.moeclub.org/GoogleDrive/1NC6Z2EJURZ_cr9AmG4o9uLLxquTxGC9S'
最后会自动下载一些东西,然后到92851 blocks就自动断开 SSH 了,这时候就是已经在安装系统了。
不过由于是全新安装系统,比较慢,需要耐心等待约半个小时哦~期间可以 ping 自己 VPS 的公网 IP,正确设置的话是响应的,如果未响应可能前面的 IP 设置有误~请仔细检查参考教程重新尝试,如果实在不行也可以留言咨询~
安装好后通过 “远程桌面连接” 自己的公网 IP ,用户名一般是 Administrator ,密码不同 dd 包不同,可以在上面翻到。
安装好后的一些事情
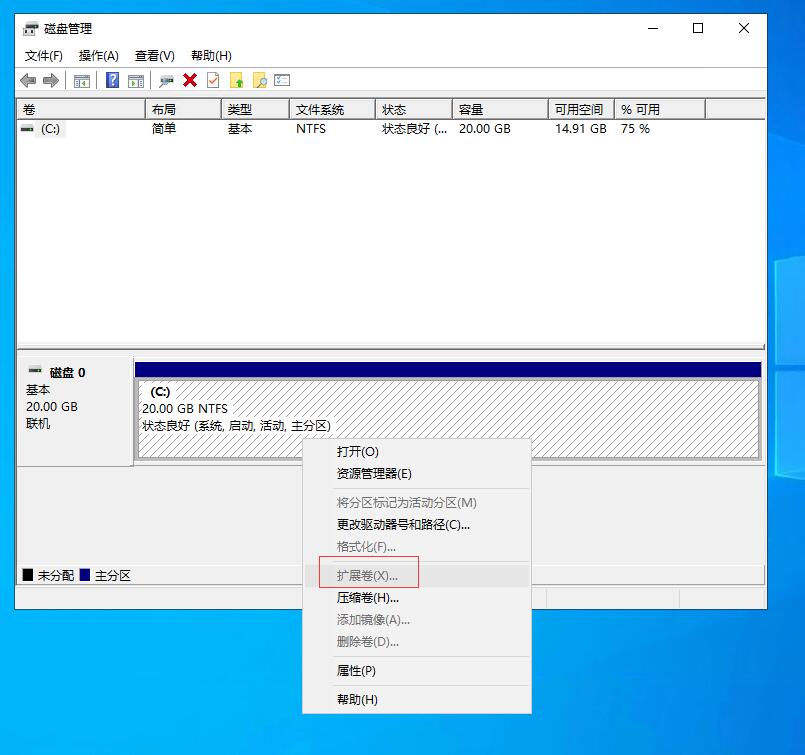
1.安装好后硬盘是按照包的默认大小配置的,需要在磁盘管理中“扩展卷”


2.连接上后如果遇到无法打开网页的情况,修改DNS即可
8.8.8.8
8.8.4.4
附:Oracle甲骨文 专用包
此DD包仅适用于Oracle甲骨文DD Win使用
# DD Windows7 64位 旗舰精简版 [账户Administrator密码www.nat.ee]
wget --no-check-certificate -qO InstallNET.sh 'https://moeclub.org/attachment/LinuxShell/InstallNET.sh' && bash InstallNET.sh -dd 'https://oss.sunpma.com/Windows/Oracle_Win7_64_Administrator_www.nat.ee.gz'

# DD Windows7 sp1 64位 企业精简版 [账户Administrator密码www.nat.ee]
wget --no-check-certificate -qO InstallNET.sh 'https://moeclub.org/attachment/LinuxShell/InstallNET.sh' && bash InstallNET.sh -dd 'https://oss.sunpma.com/Windows/Oracle_Win7_sp1_64_Administrator_www.nat.ee.gz'
OVH 专用包
此DD包仅适用于OVH云服务器DD Win使用
说明:OVH需要使用网络参数进行安装,需要的可以参考下面的安装方法,博主并未进行测试,这里仅提供直链包;
# DD Windows7 64位 精简版 [账户administrator密码www.80host.com]
https://oss.sunpma.com/Windows/win/OVH_Win7_64_administrator_www.80host.com.gz
文章出处:CNBoy 四海部落,刀云转载